
Mastering Knockout Groups for Map Design in Adobe Illustrator
Adobe Illustrator is a powerful tool for map design, and mastering a few lesser-known features can take your maps to the next level. One of those features is Knockout Groups, a hidden gem that makes map labels clean, readable, and professional.
Whether you're dealing with cluttered backgrounds, overlapping elements, or just want your labels to pop, Knockout Groups are a game-changer. This tutorial will walk you through exactly how to use them to enhance your maps in Illustrator.
> Want to follow along? Download the FREE Illustrator map file below.

Knockout Groups make a big difference on map readability.
What Are Knockout Groups?
Knockout Groups allow certain objects (like text or icons) to visually "cut through" or knock out the elements below them. You can think of it as a dynamic buffer—it creates space around labels without needing to manually erase or mask out the lines and fills underneath.
Why it matters for map design:
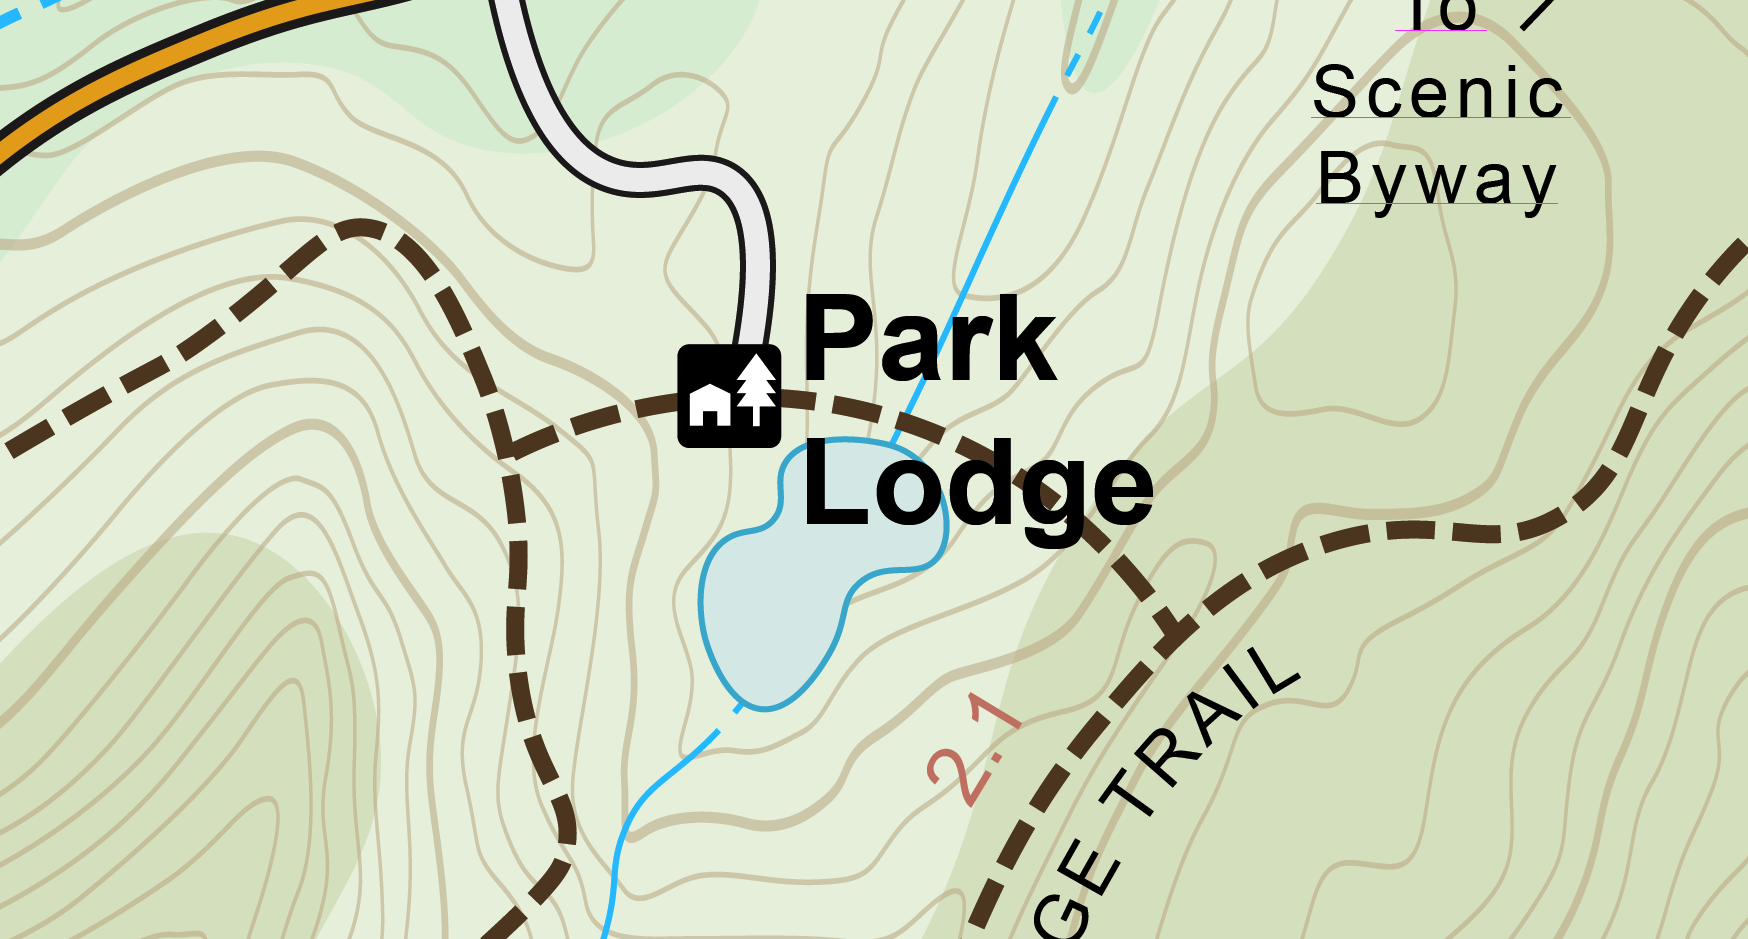
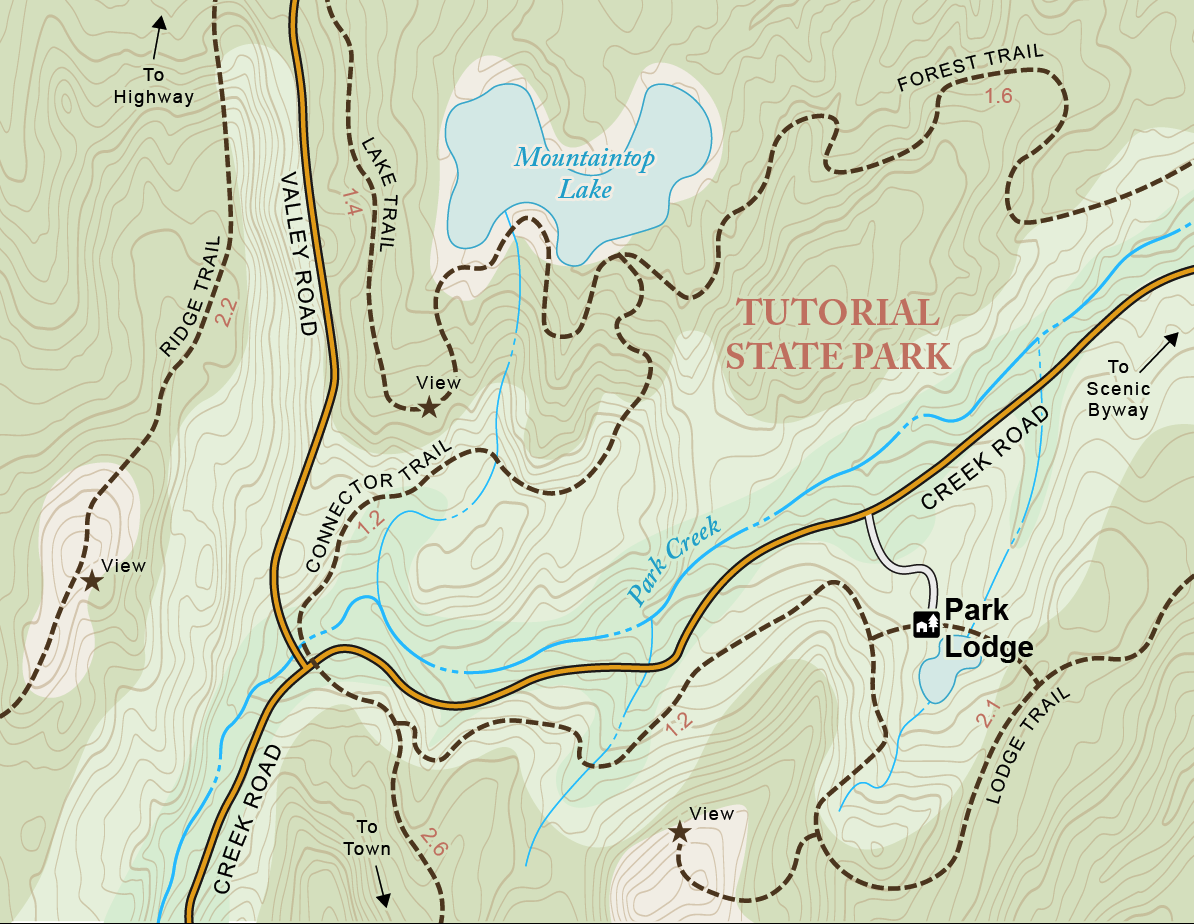
Ever struggled with text sitting on top of multiple background colors or linework, making it hard to read? (See Figure 1) With Knockout Groups, you can automatically clear space behind your labels, giving your map a cleaner and more readable look. (See Figure 2)
(Figure 1) Labeling WITHOUT Knockout Groups. The stream, trail, and contours touch the label, which can be difficult to read at small scales

(Figure 2) Labeling WITH Knockout Groups. Notice the buffer around the “Park Lodge” text. Knockout Groups create a nice offset around the text, making for a clean look.
Getting Started with Knockout Groups
1. Locate the Knockout Group Option
The Knockout Group setting is found inside the Appearance Panel:
Select your object or group.
Go to:
Appearance > Opacity > Knockout GroupDon’t see the Appearance Panel?
Go toWindow > Appearancein the menu bar to open it.
(See Figure 3)
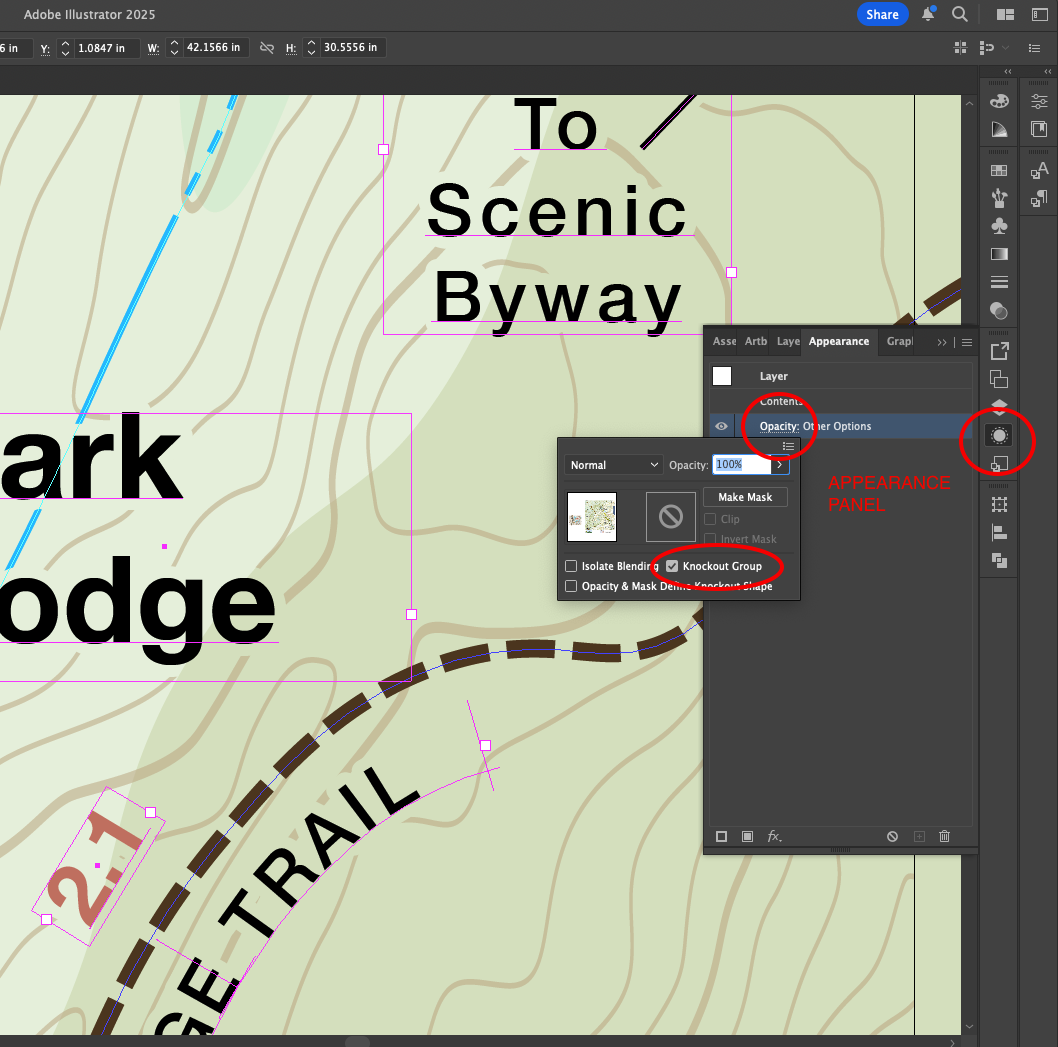
(Figure 3) Appearance > Opacity > Knockout Group (If you do not see the Appearance Panel, go to Window > Appearance)
2. Understand the Appearance Panel
Before we get too far, it is important to know how the appliance panel works. The Appearance Panel shows all fills, strokes, and effects applied to an object.
For example:
An object like “Mountaintop Lake” may have:
A 1pt dark blue stroke
A light blue fill
The stroke appears above the fill. (See Figure 4)
You can rearrange these by dragging them up or down in the stack or add new strokes/fills by using the buttons in the lower-left corner of the panel.
> Try this: Add a new stroke, drag it below the fill, and observe how it appears visually.
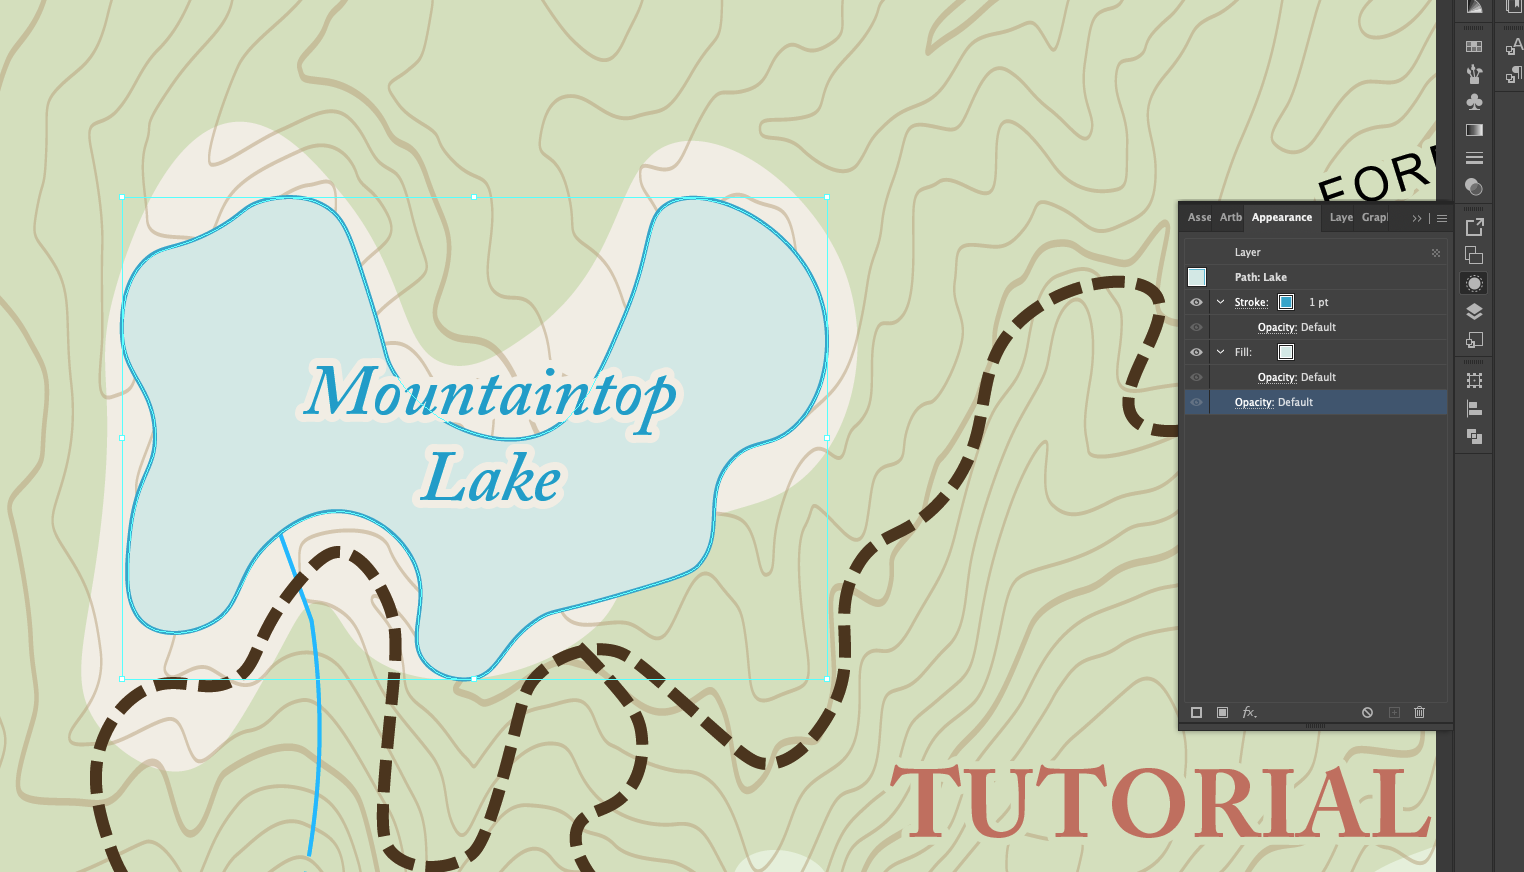
(Figure 4) Mountaintop Lake Appearance Panel
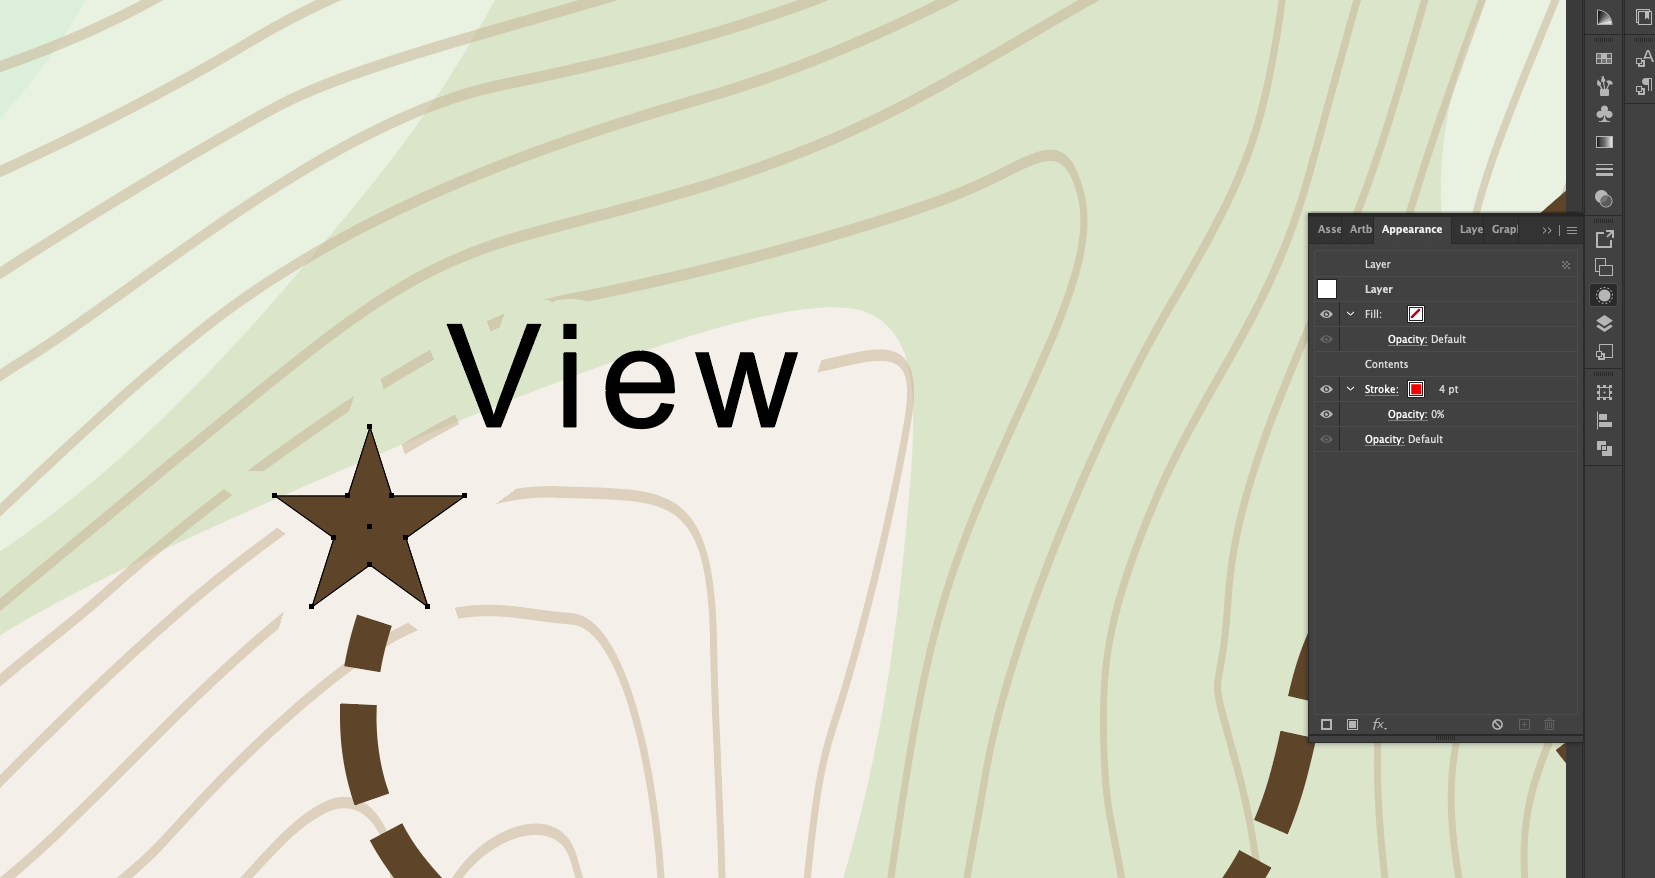
You can also change the appearance of an entire layer the same way. This is the key to efficient labels with Knockout Groups. Instead of applying strokes to every object, we will apply it to the “Labels KG” layer. This will give every object on the layer the same stroke. Click on the gray circle next to the layer titled “Labels KG” (See Figure 5), then click on the appearance panel to see how it is set up.
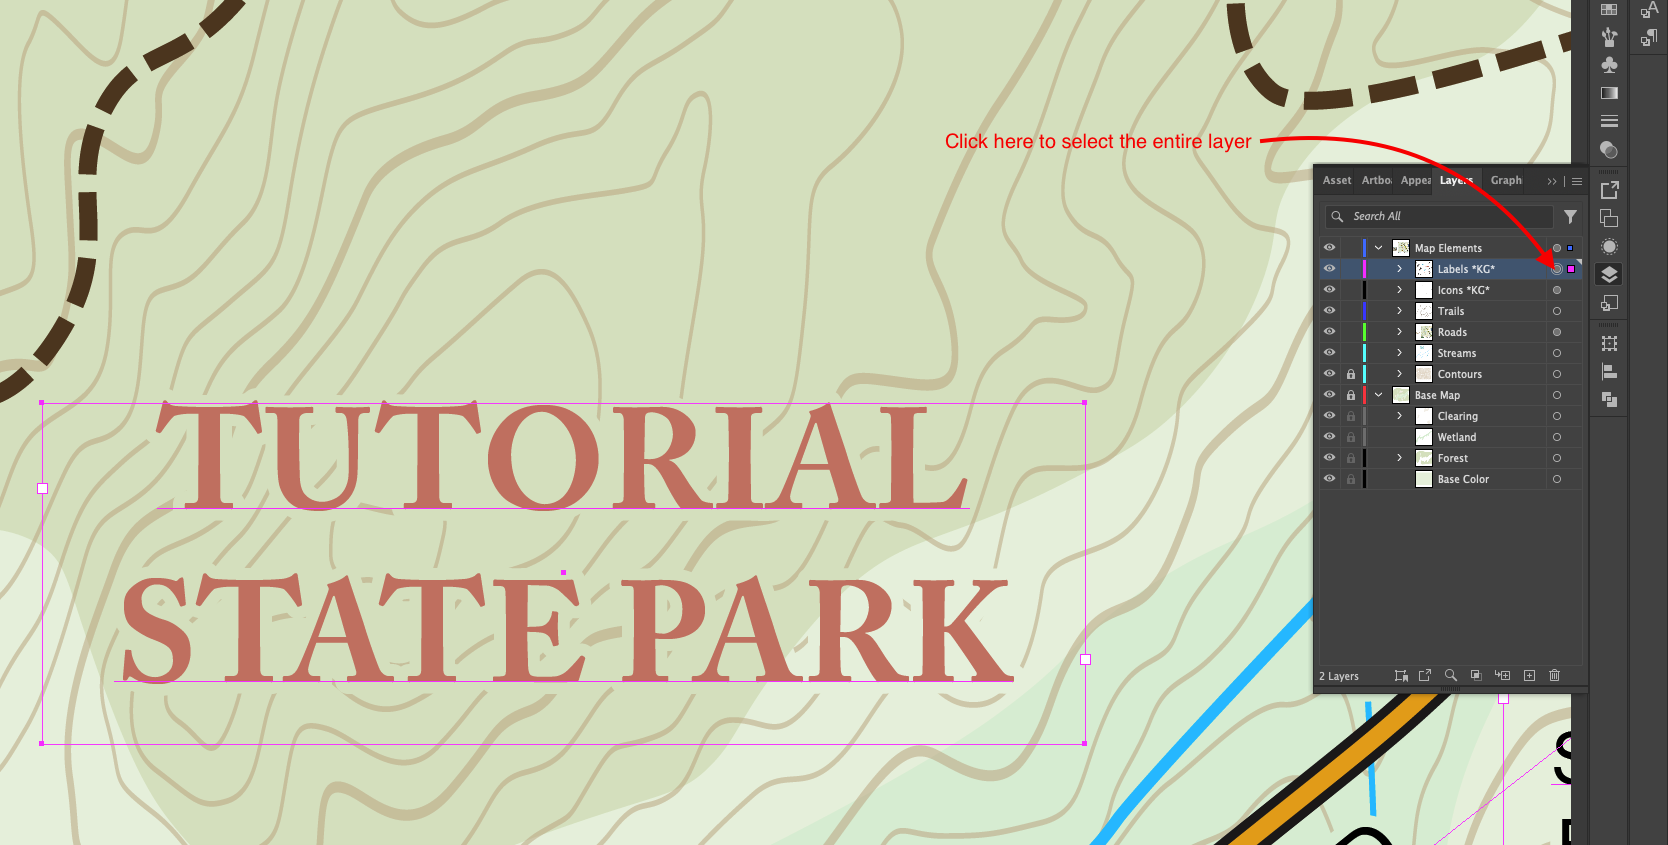
(Figure 5) Clicking the small gray circle next to a layer selects the layer itself, selecting the box next to it only selects the contents inside the layer, a subtle but important difference.
Once you have the layer selected click on the appearance panel to see how the layer is being altered (See Figure 6). Here we can see that the entire “Labels KG” layer has a 4 pt stroke at 0% opacity AND that it is BELOW the layer’s “Contents”, which is all the stuff on the layer.
This is the key to Knockout Groups. The width of this stroke is the size of our clear space around the label and the opacity controls if the stroke is visible. Since we want to see through the effect, it is always kept at 0% opacity.
> Try this: Increase the size of the red stroke to see the text buffer change. Slide the opacity to see the red stroke come back.
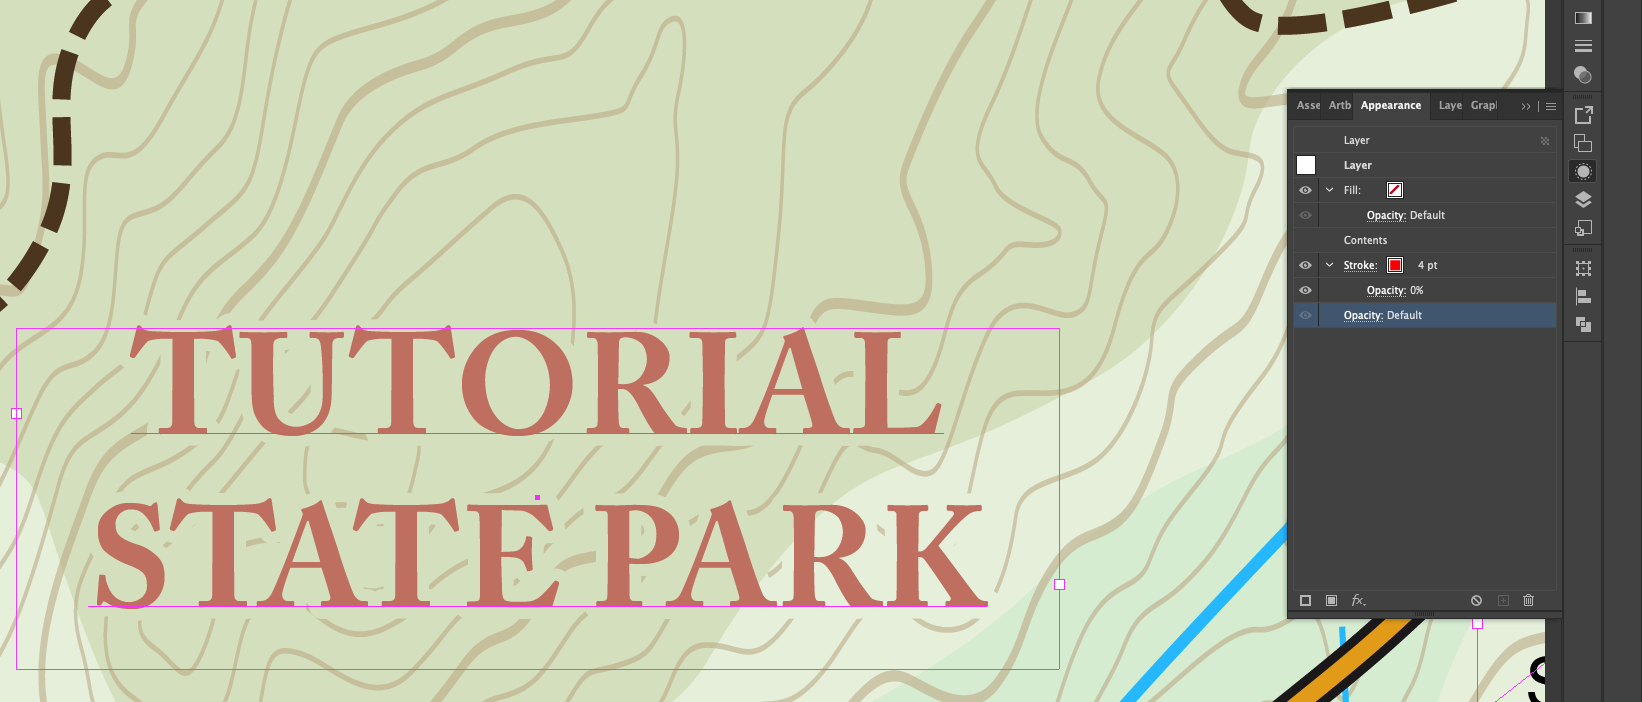
(Figure 6) You can see that this entire layer has a red 4 pt stroke at 0% opacity BELOW the “Contents”
3. Create the Knockout Effect
Here’s the trick:
Add a stroke below the text and set its opacity to 0%. This transparent stroke plus the Knockout Group will “punch out” any lines or fills behind the label—without affecting the look of your text.
This is the essence of Knockout Groups for labeling. (See Figure 7 for a side-by-side comparison of label variations.)
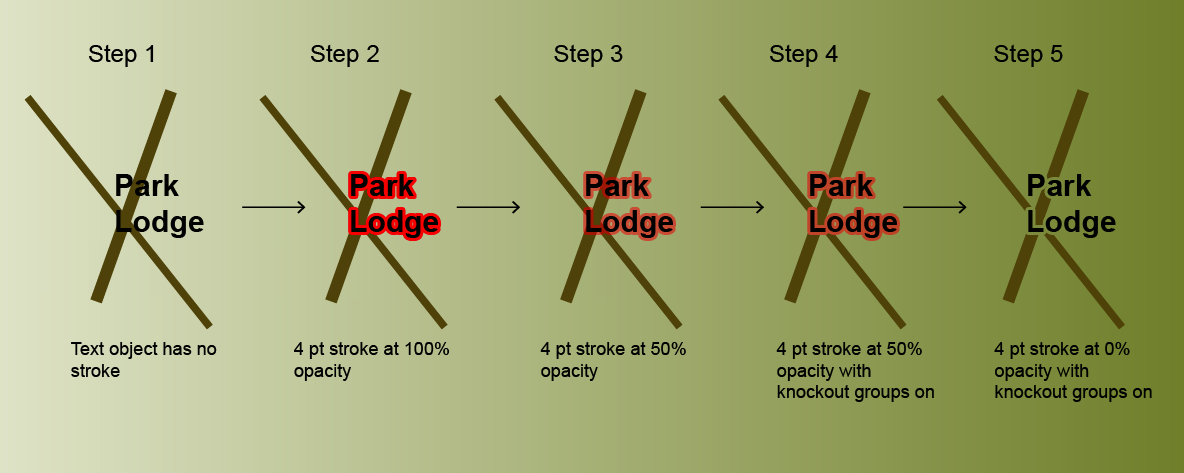
(Figure 7) Notice the difference between Step 3 and Step 4. With Knockout Group ON, the brown line is hidden wherever the red stroke is.
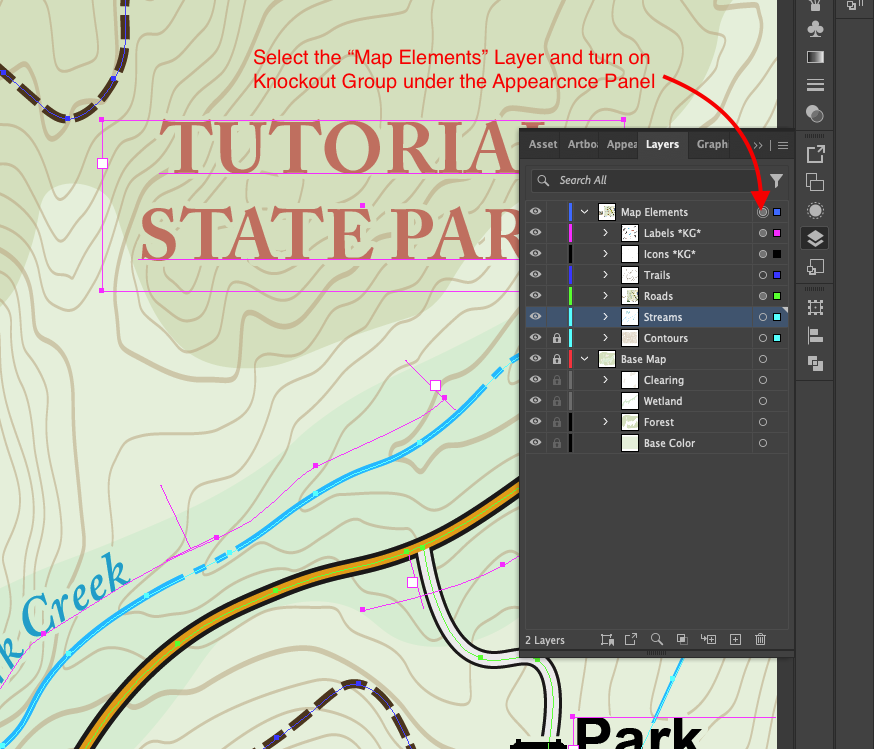
Once you have the stroke set up, select the Layer your text sublayer is inside. If you are following along with the map, it is the “Map Elements” layer (See Figure 8).
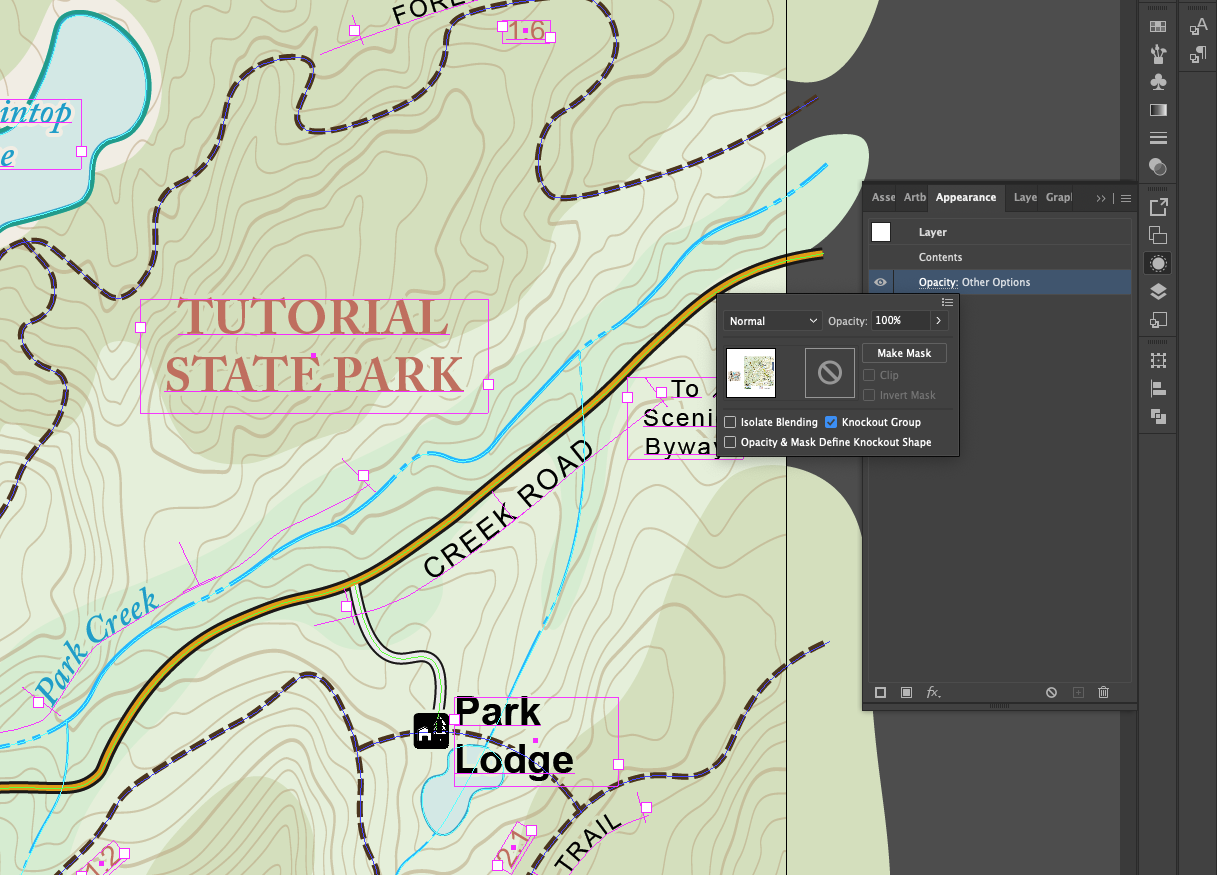
Go to Appearance > Opacity > Knockout Group (See Figure 9)
Check the Knockout Group box to turn it on (click several times if the checkmark does not come up right away)
With this on, those red strokes will hide any objects or lines behind them, creating the label clear space.
💡Tip: Switch Illustrator to “CPU Preview” for faster Knockout Group effects. Menu bar > View > Preview on CPU
(Figure 8) The knockout Group checkbox should only be on for the BIG layer containing your text and object sublayers. Not the sublayers themselves.
(Figure 9) Check the Knockout Group box for the layer containing your sublayers
Applying Knockout Groups to icons can also help your map easier to read. Notice how the star hides the contours behind it.
Organizing Your Layers
Layer structure is critical for Knockout Groups to work properly.
Recommended Map Layer Setup:
Base Layer
Contains your background: terrain, vegetation, raster elements, etc.
Not affected by knockout groups.
Map Elements Layer
Contains all icons, lines, and text that will be affected by Knockout Groups.
This layer should have the Knockout Group checkbox turned on.
Label Sublayers
Add sublayers under “Map Elements” for different label and object categories.
Use a “KG” notation to indicate that a layer includes knockout stroke buffers.
Ensure text sits at the top of each sublayer to properly knockout elements beneath it. (See Figure 10)
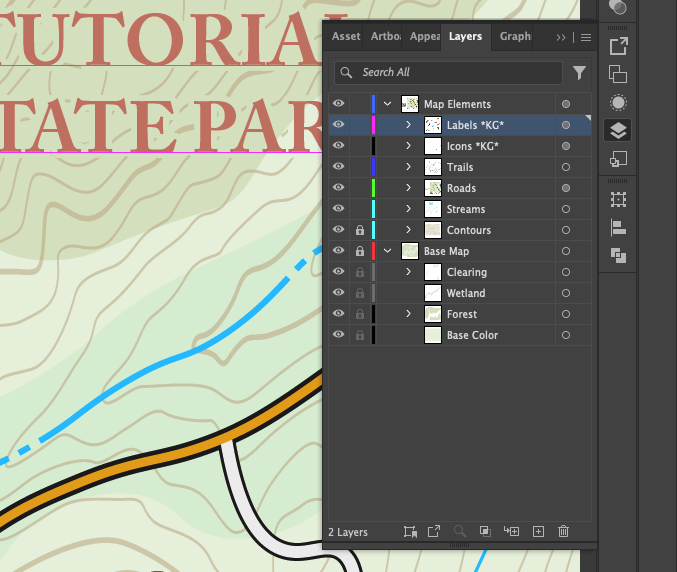
(Figure 10) Pay careful attention to the layer organization.
Wrapping Up
Recap
Knockout Groups create a “clear zone” around text and objects, making your maps easier to read
Apply the Knockout Group to the layer containing your text and object sublayers
Select the layer and go to Appearance > Opacity > Knockout Group
Apply a stroke at 0% opacity to the sublayer you want to have the buffer
Select the sublayer and go to Appearance > Stroke (Make sure the stroke is BELOW “Contents”
Changing the width of this stroke changes the buffer zone
Keep your text layers above your other map layers
Now You’re Mapping like a Pro
Knockout Groups are one of the best-kept secrets in Illustrator for map design. Once you understand how the Appearance Panel, layer structure, and opacity settings work together, you’ll wonder how you ever labeled maps without them.
Knockout Groups make your maps clean and easy to read!